Create Product
Learn how to create a new product using the vendor dashboard.
On this page
In this guide, you'll learn how to create a new product using the Aiminaabee vendor dashboard.
Types of Products to Create
You can create different types of products in Aiminaabee:
- A simple product without variants, such as a painting.
- A product with variants, such as a t-shirt with different colors and sizes.
- A product that has multi-part variants, such as a bicycle that consists of a frame, wheels, and handlebars. Each variant has an inventory kit that makes up the product's parts.
- A product that is sold as a bundle, such as a camera bundle that consists of a camera, a lens, and a camera bag. Each variant has an inventory kit of each product variant's inventory items.
This guide covers the general steps to create any of these products. You can also refer to the specific guides for creating multi-part products and bundle products.
How to Create a Product
To create a new product:
- Go to the Products page from the sidebar.
- Click the Create button in the main section's header.
This opens a form with three steps: Details, Organize, and Variants. There's a fourth optional step Inventory Kits that's only shown if you enable the Has inventory kit toggle for a variant, as explained in the third step.
1. Details Step
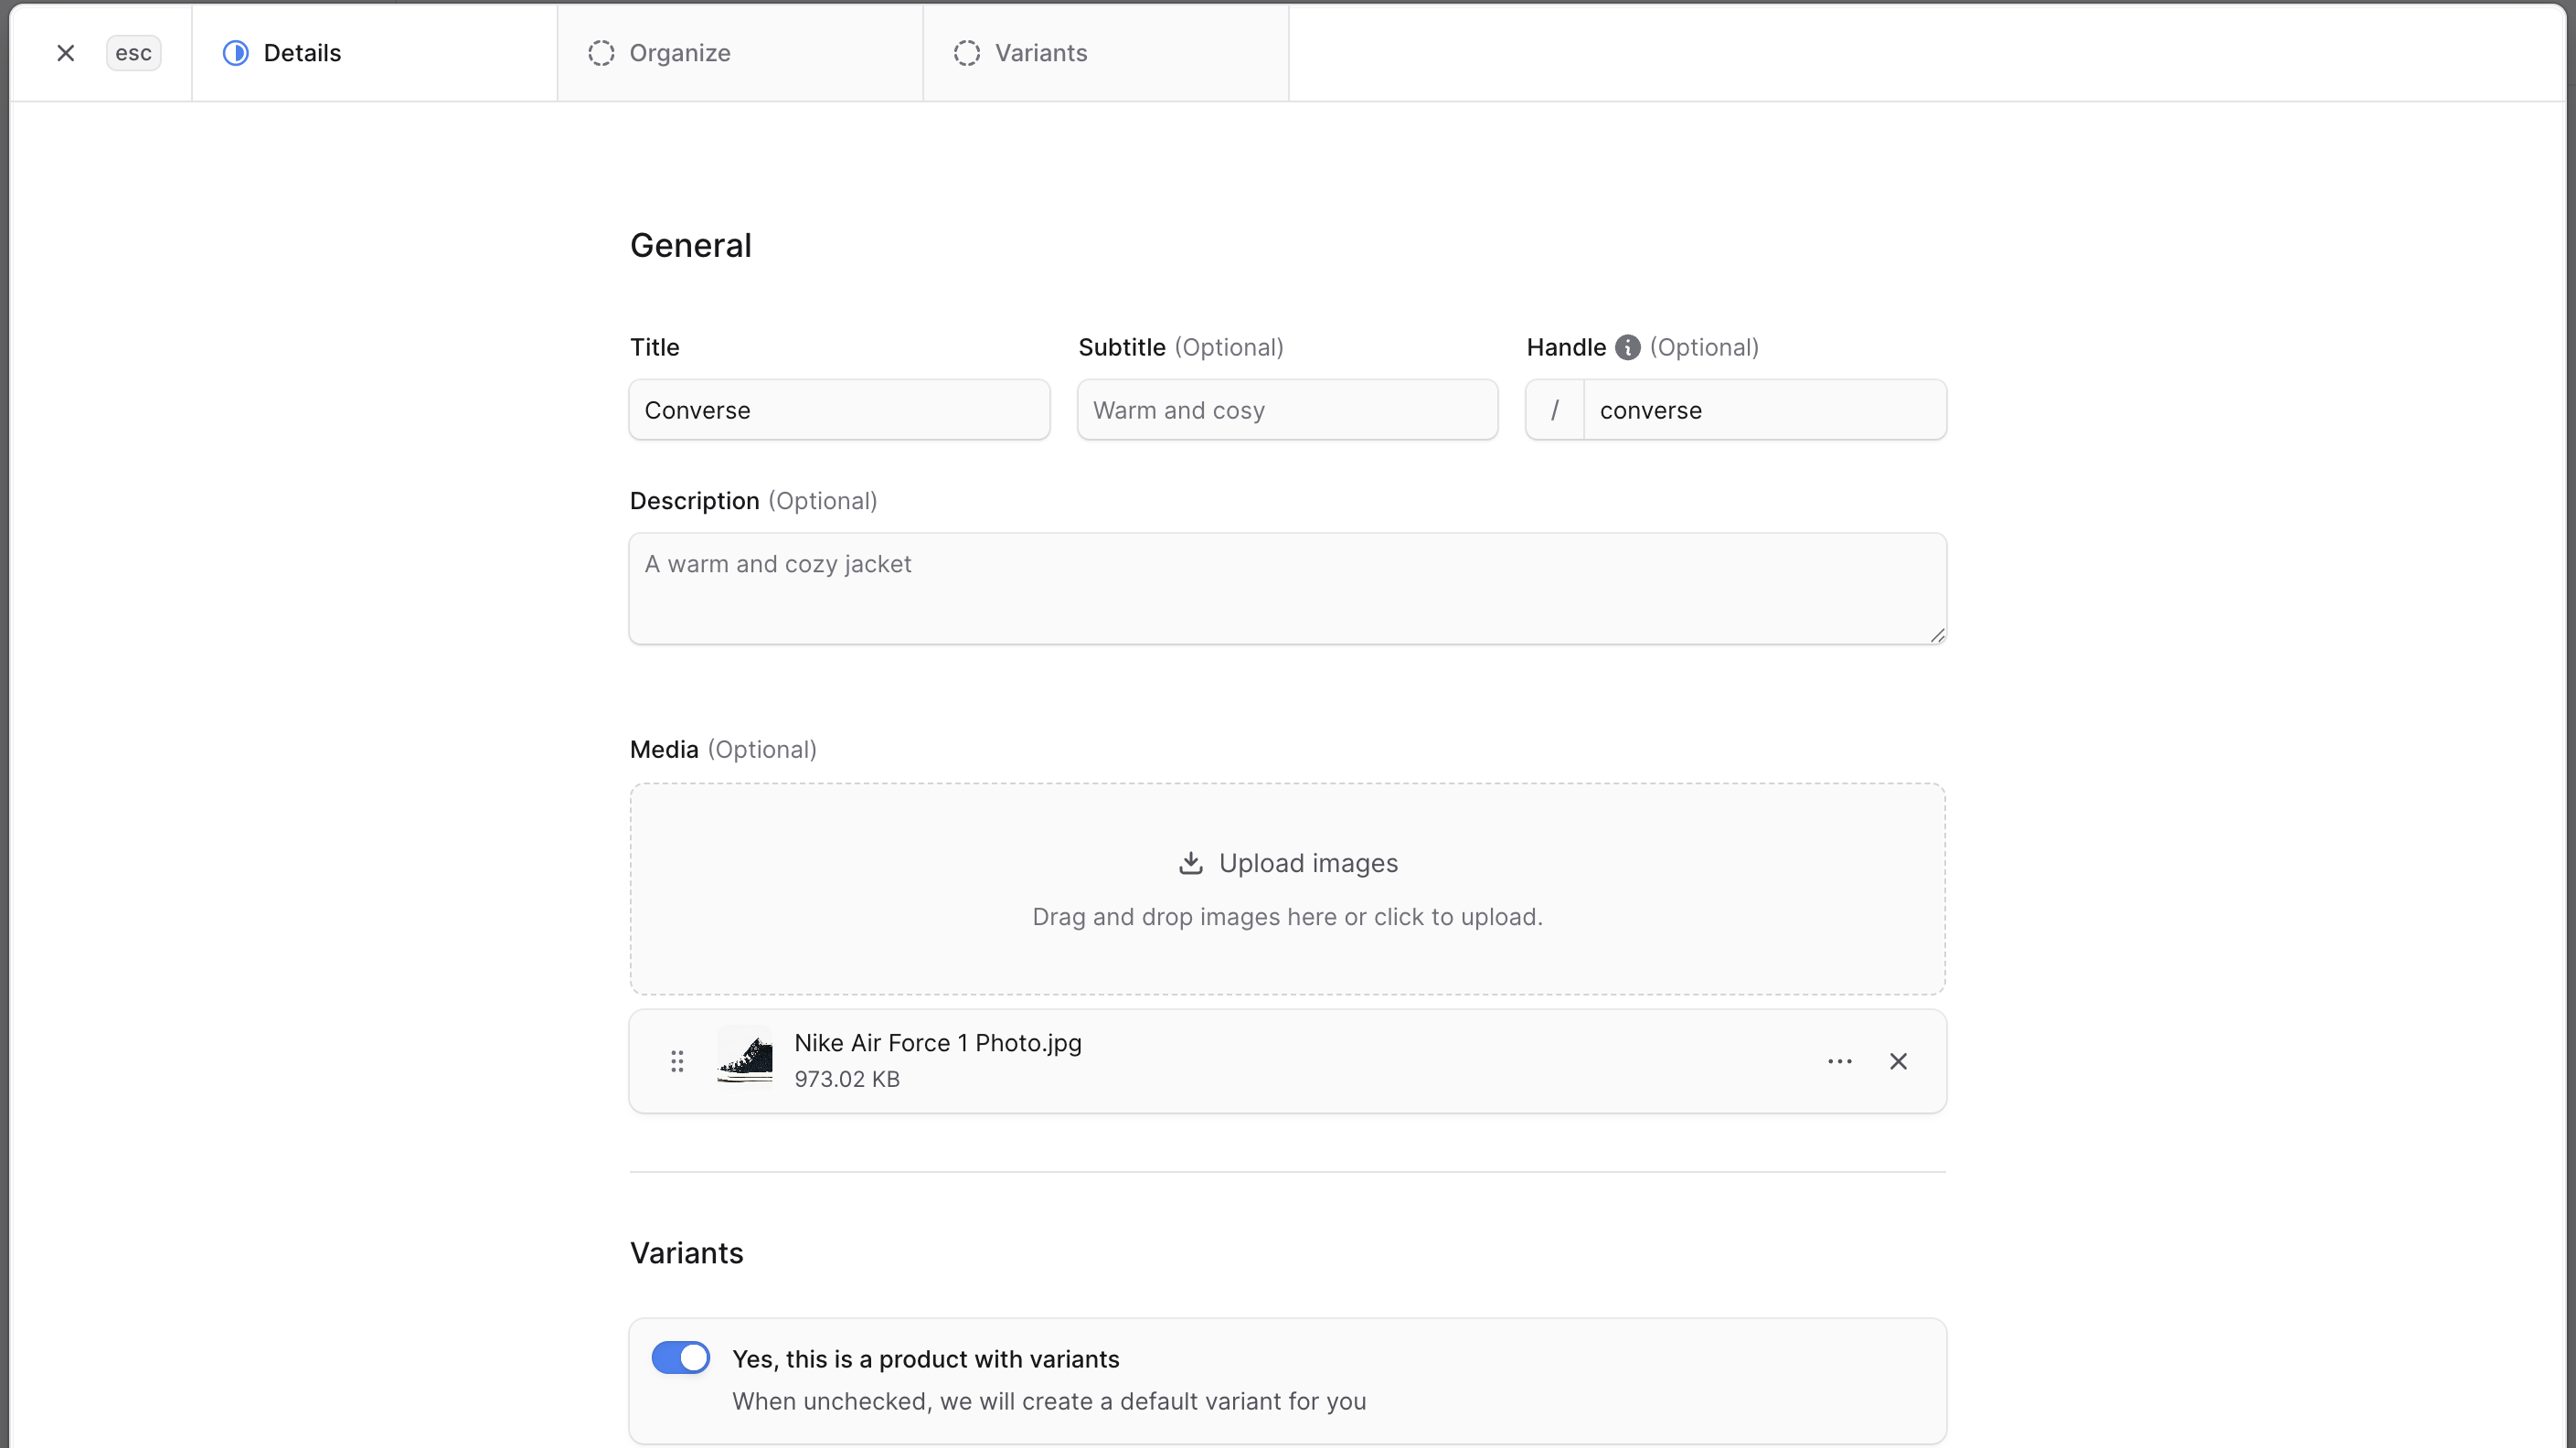
In the first Details step, you can enter the product's general information and specify its variants and options:
- Enter the product's name in the Title field. This is the only required field in the form.
- Optionally enter a Subtitle, Handle, and Description.
- The value of the Handle field is used in the product's URL on the storefront. It allows you to create a human-readable URL for the product. The handle must be unique across all products, and it must contain lowercase letters, numbers, and hyphens (
-). If not specified, Aiminaabee will generate a handle from the title.
- The value of the Handle field is used in the product's URL on the storefront. It allows you to create a human-readable URL for the product. The handle must be unique across all products, and it must contain lowercase letters, numbers, and hyphens (
- Optionally upload images of the product under the Media section.
- To set an image as the thumbnail:
- Click the three-dot menu in the image's row.
- Choose Make thumbnail from the dropdown.
- To set an image as the thumbnail:
- If the product has variants, such as different colors or sizes, enable the Yes, this is a product with variants toggle. This shows new fields to choose product options.
- You can choose from existing product options or enter a title to create a new product option.
- You can select multiple options for the product.
- Entering a new product option here creates an option specific to this product. It can't be used by other products.
- For new product options, you can enter possible values separated by commas. For example, for a size option, you can enter
Small, Medium, Large. - For existing product options, you can choose from the available values of the option.
- After adding the options, product variants are created automatically from these options.
- You can disable creating a product variant by unchecking its checkbox.
- You can re-arrange the order of the variants by dragging and dropping them.
- You can choose from existing product options or enter a title to create a new product option.
When you're done, click Continue.
2. Organize Step
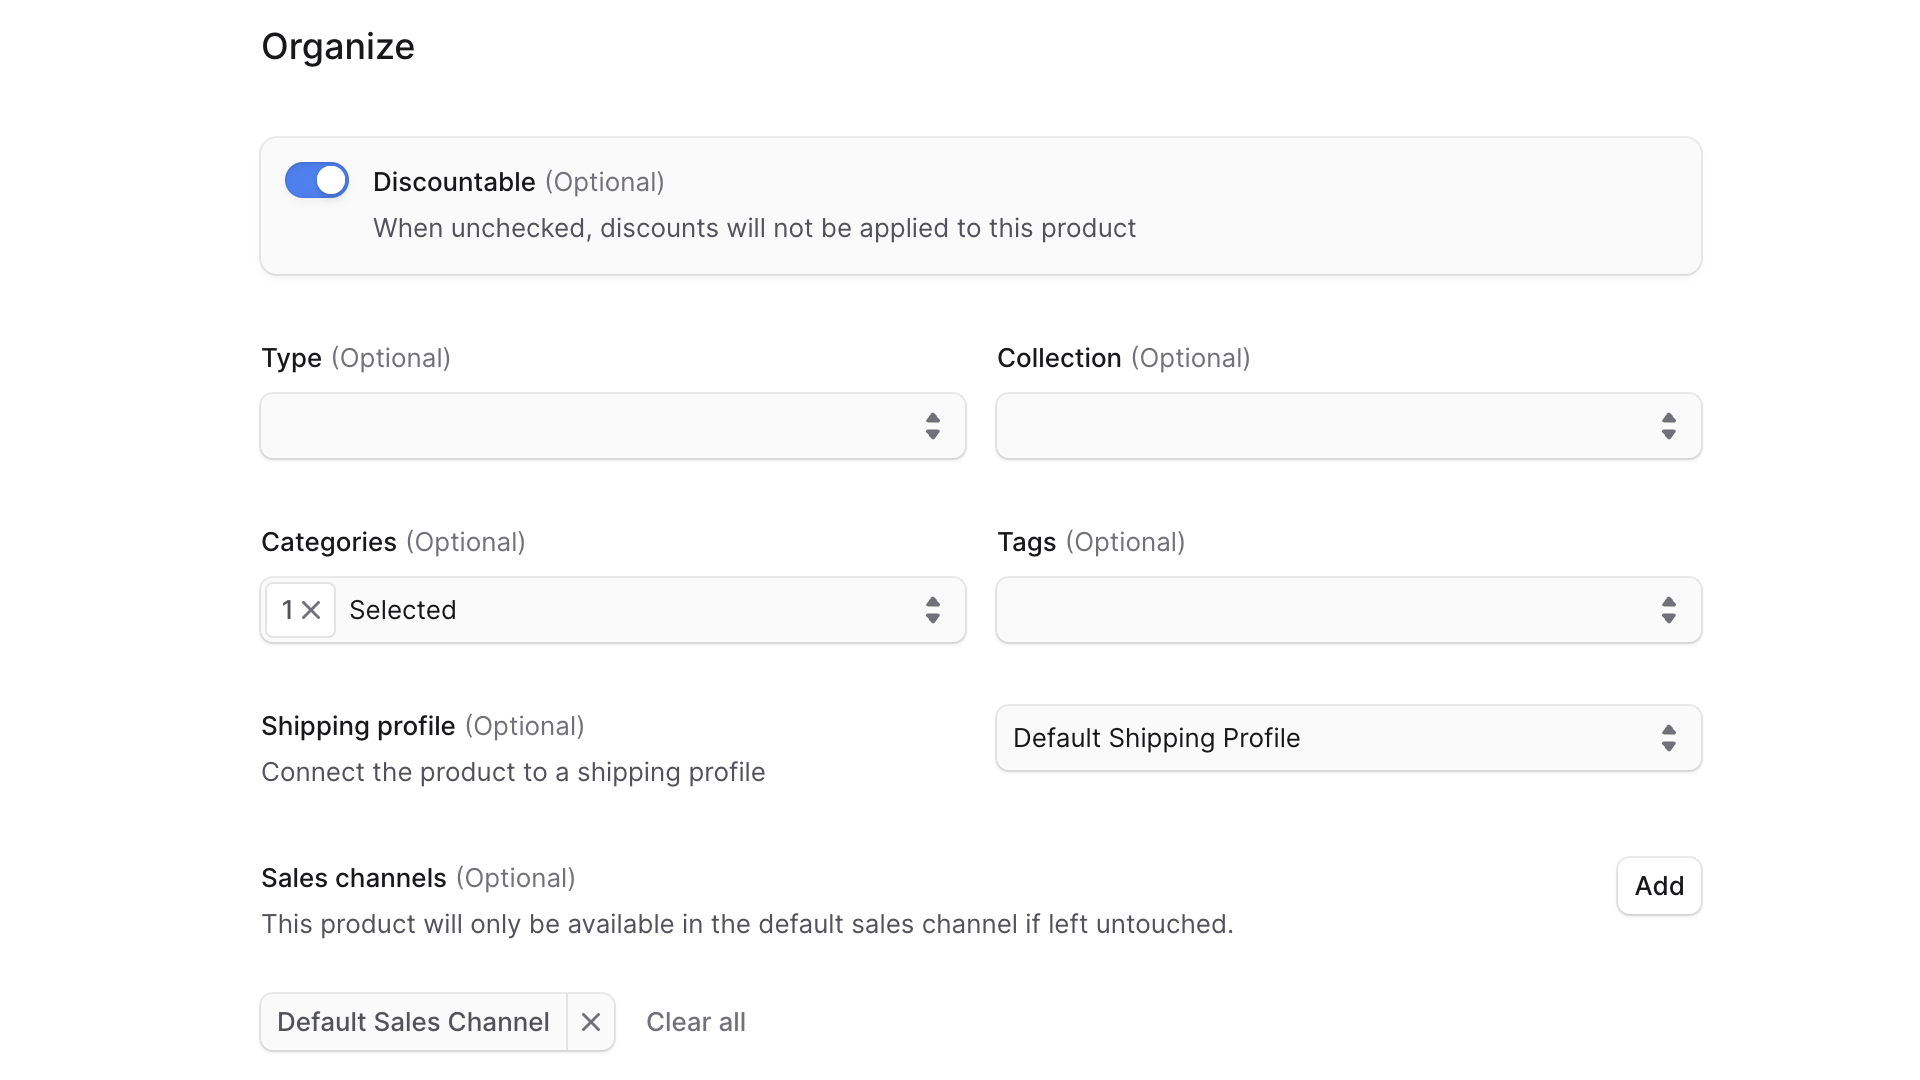
In the second Organize step, you can organize the product by adding it to collections, categories, and other organization details:
- If you don't want to allow applying discounts to the product, disable the Discountable toggle.
- You can optionally choose a type for the product. You can manage product types in Settings.
- You can optionally choose a collection for the product. You can create collections under Manage Collections.
- You can optionally choose categories for the product. You can create categories under Manage Categories.
- You can optionally add tags to the product. You can manage product tags in Settings.
- You can optionally choose a shipping profile for the product. A shipping profile defines how a product can be shipped. You can manage shipping profiles in Settings.
- You can optionally set the sales channels a product is available in. In the storefront, only products that are in the storefront's sales channel can be purchased. To add the product to a sales channel:
- Click Add next to the Sales channels section.
- In the list that opens, check the sales channels you want to add the product to.
- When you're done, click Save.
When you're done with this step, click Continue.
3. Variants Step
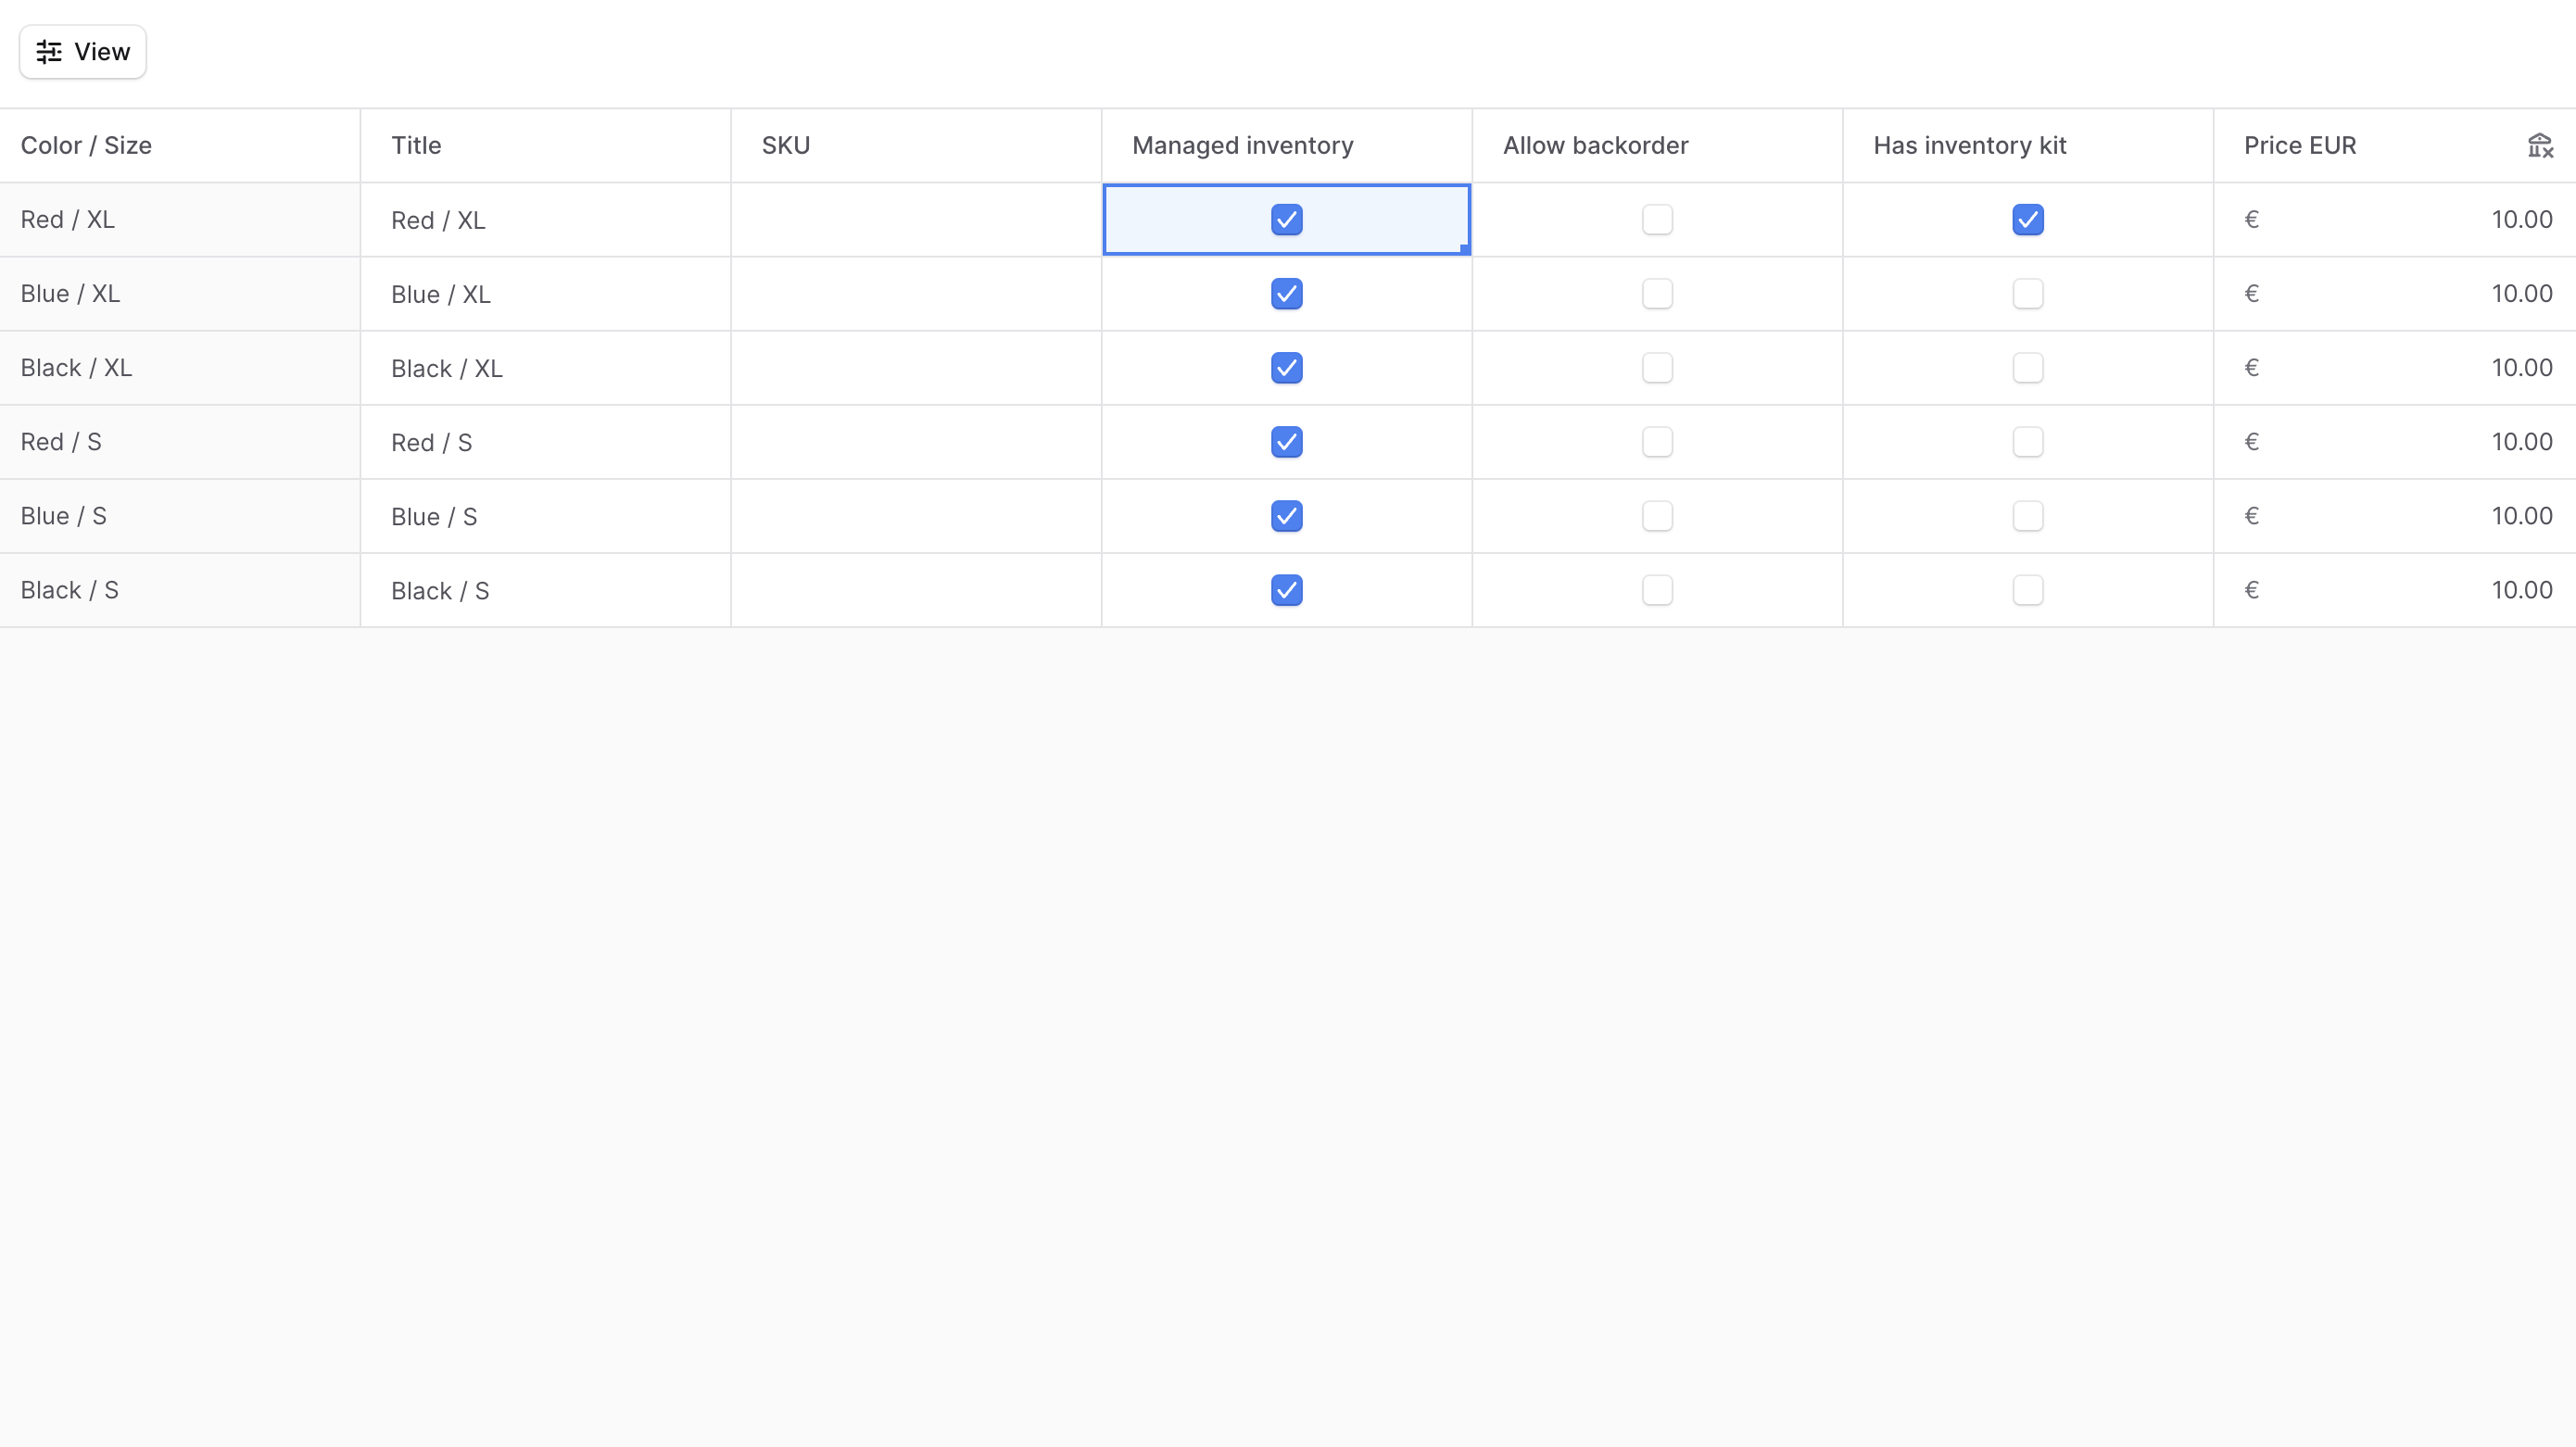
In the third Variants step, you can manage the product's variants you added in the first step. The step shows a bulk editor with a row for each variant:
- In the Title column, you can change the variant's title.
- In the SKU column, you can set the variant's SKU.
- In the Managed Inventory column, you can enable inventory management for the variant. If disabled, the variant is always considered in stock. Otherwise, you can set the inventory quantity in different stock locations, and Aiminaabee will manage that inventory, such as decrementing it when the variant is purchased.
- In the Allow backorder column, you can enable backorders for the variant. If enabled, customers can purchase the variant even if it's out of stock.
- In the Has inventory kit column, you can enable inventory kits for the variant, allowing you to add multi-part or bundled products. If enabled, you'll see a fourth step Inventory Kits after this step.
- The next columns are price columns for all the currencies and regions you have set up in Aiminaabee. You can set the price for each variant in each currency and region. You can also add the prices after creating the product.
- Price columns marked as tax-exclusive are tax-exclusive prices. Aiminaabee will calculate taxes during checkout and add them to this price.
- Price columns marked as tax-inclusive are tax-inclusive prices. Aiminaabee will calculate taxes during checkout as part of this price.
Tax-inclusive pricing is configured in the store or region settings.
When you're done, either click Publish if there are no more steps, or click Continue to go to the next step.
4. Inventory Kits Step (Optional)
If you enabled the Has inventory kit checkbox for a variant in the third step, you'll see a fourth optional step Inventory Kits. Inventory kits allow you to create:
- A multi-part product, where a product is made up of multiple parts. For example, if you're selling a bicycle that consists of a frame, wheels, and handlebars, you can add the frame, wheels, and handlebars as inventory items in the variant's inventory kit.
- A bundled product, where products are sold as a bundle. For example, if you're selling a camera bundle that consists of a camera, a lens, and a camera bag, you can add the inventory items of each of these product variants in the variant's inventory kit.
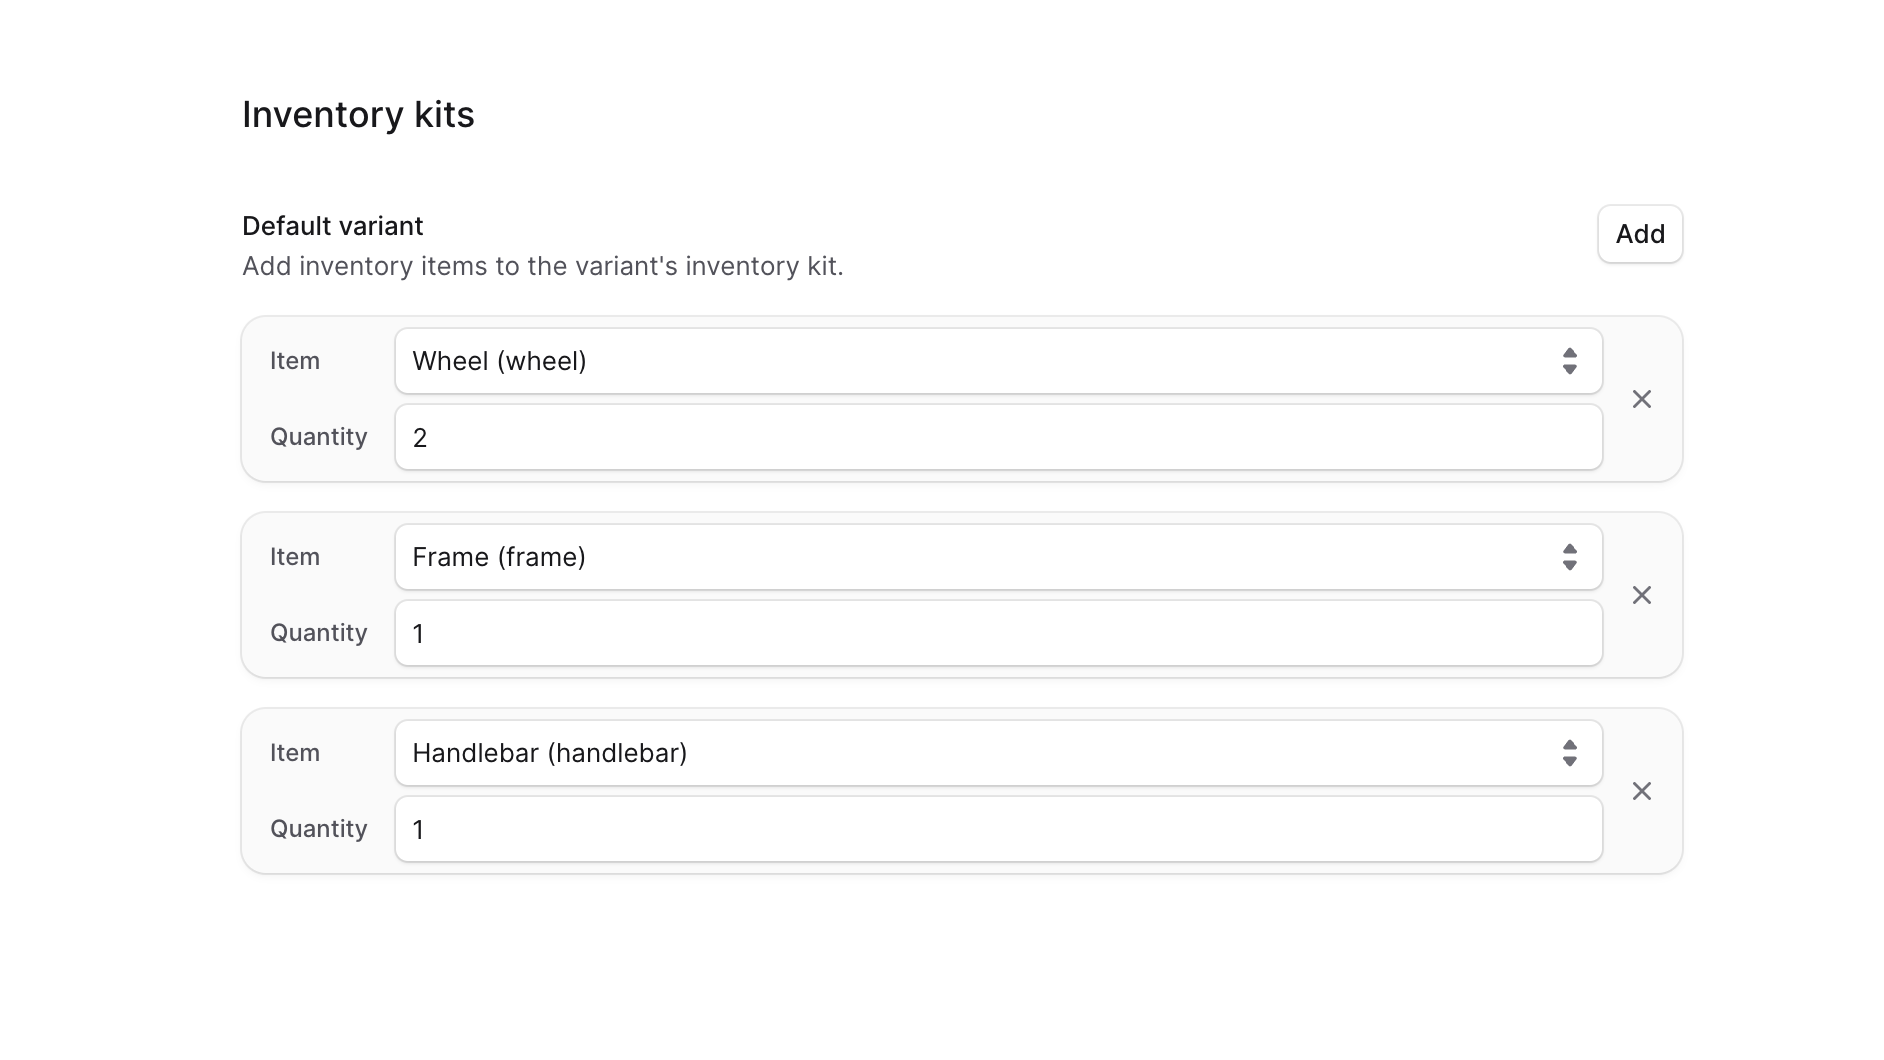
To manage the inventory kit of variants in the fourth step, for each variant:
- Select an inventory item from the dropdown.
- In the Quantity field, enter the quantity required for a single item of the variant. For example, if the variant is a bicycle and the inventory item is a wheel, you can enter
2in the Quantity field to indicate that the variant requires two wheels. - To add more inventory items, click Add.
When you're done, click Publish.
You can now manage the product you created.